Page 2 of 3 FirstFirst 123 LastLast
Results 26 to 50 of 52

Thread: Bolt on neck method

  1. #26
    Registered User Jim Baker's Avatar
    Join Date
    Jan 2006
    Location
    Merrickville, Ontario, Canada
    Posts
    579

    Default Re: Bolt on neck method

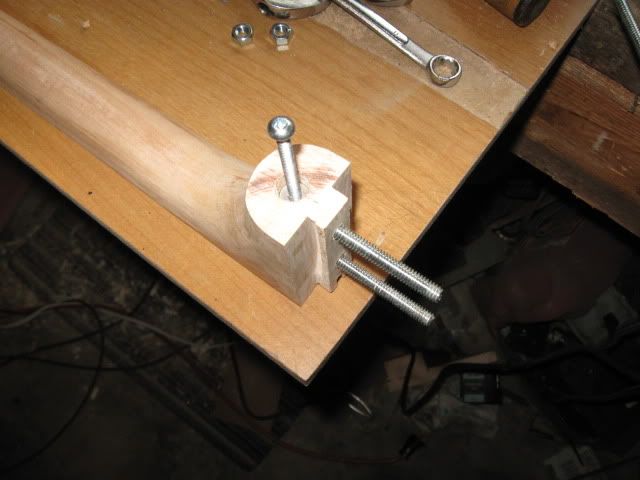
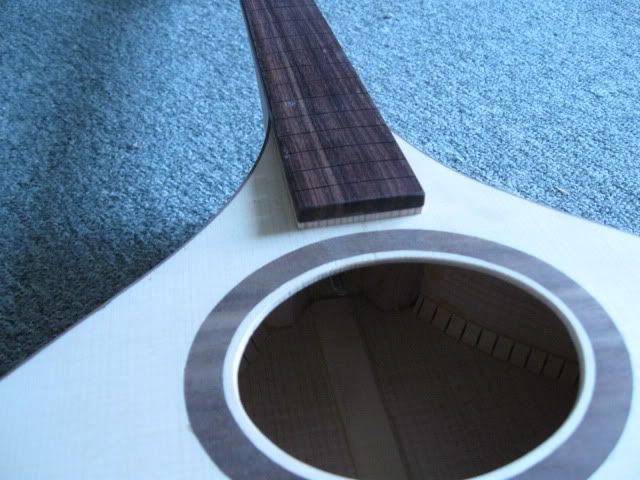
    Hmmm.......thanks Graham. I'm able to reach through the sound hole with a brad drill and mark the heel. I think I should be o.k.. The tenon is 5/8" wide. If need be I can recess the insert further in. I believe the insert from McMaster Carr is 3/8" diameter.
    Next time I'll think about this ahead.
    Carbon fiber..... I just ordered my cf neck stiffener from Stewmac. Oh well, next time I'll think about this ahead. It sure would be nice not to have to glue down the extension.
    Jim Baker

  2. #27
    Registered User Rob Grant's Avatar
    Join Date
    Mar 2004
    Location
    FNQ, Australia
    Posts
    1,182

    Default Re: Bolt on neck method

    Nice work Jim. With that particular classic style body and neck, I can see a definite advantage to the bolt on neck.
    Rob Grant
    FarOutNorthQueensland,Oz
    http://www.grantmandolins.com

  3. #28
    Registered Mando Hack dunwell's Avatar
    Join Date
    Oct 2005
    Location
    Colorado
    Posts
    327

    Default Re: Bolt on neck method

    I have been using a rod type anchor vertically in the heel for some time now. This has the advantage that it won't split out the heel wood like the inserts do and if it ever strips it can be pulled and replaced with just removing/replacing the heel cap. On a mandolin you wouldn't even have to do that what with the button. I make the vertical rod out of T-6 aluminum or brass and dust them with powdered graphite so that it won't gall with the furniture bolts. You can see an example of this on my web sit. Go to
    http://dunwellguitar.com/
    click on the Luthier Links and then on "Let's Build A Bouzouki" and follow the links to page-4 down near the bottom of the page. Similar photos in the "Let's Build A Guitar" pages. The rod is flatted on one side to help start the holes and then cross drilled to match the bolt threads. It slips in place and is snug enough that it doesn't move around once it is placed. The bottom end is drilled and tapped for 10/32 so you can screw in a bolt to pull it if needs be.

    Alan D.

  4. #29
    Registered User Jim Baker's Avatar
    Join Date
    Jan 2006
    Location
    Merrickville, Ontario, Canada
    Posts
    579

    Default Re: Bolt on neck method

    Wow! Thanks Alan. You got me thinking again. I like the idea of using aluminum. Since I am using 2 bolts I can make a rod full length with 2 threaded holes without adding so much weight. I wasn't going to add a heel cap, but now I think it might set off the walnut binding. If I make the heel cap to match the depth of the binding it should look o.k.
    Jim Baker

  5. #30

    Default Re: Bolt on neck method

    I use the threaded inserts w/o glue on my octaves & have had no problems to date. I don't use a narrow tenon, though, the natural taper of the neck is my tenon. My fingerboards float above the top.
    Attached Thumbnails Attached Thumbnails Click image for larger version. 

Name:	IMG_2158_0127 (600 x 450)..jpg 
Views:	468 
Size:	63.6 KB 
ID:	56896   Click image for larger version. 

Name:	IMG_2159_0128 (600 x 450)..jpg 
Views:	395 
Size:	51.0 KB 
ID:	56897   Click image for larger version. 

Name:	IMG_1776 Shop Pic 25 (1292 x 885).jpg 
Views:	559 
Size:	68.7 KB 
ID:	56898  


  6. #31
    Registered User 8ch(pl)'s Avatar
    Join Date
    Jan 2003
    Location
    Suburb of Dartmouth, Nova Scotia
    Posts
    2,221

    Default Re: Bolt on neck method

    Nice work Joe.

  7. #32
    Registered User j. condino's Avatar
    Join Date
    Nov 2005
    Location
    Asheville, NC
    Posts
    2,770

    Default Re: Bolt on neck method

    I've been patiently lurking, watching this thread for a bit....

    I'll second it-that looks nice and clean Joe.

    I've probably built 250+ instruments using bolt on necks- my own, for the Breedlove factory, and a couple of dozen variations with students over the years. I've used them on mandolins- all the Breedloves are a simple bolt on that you can detatch in about 10 seconds with no glue or extra; my own variation on that idea looks just like a traditional heel joint, but it is oh so sneaky and clean ( no longer in use) ; I work on an amazing variety of bolt on guitar designs over at Dream Guitars ( www.dreamguitars.com) and I also use a bolt on system for the detachable neck on my fully carved double basses, and I do retrofit conversions on old Kay basses with a removable bolt on neck system.....blah, blah, blah....you get the idea....

    From all of these, my feeling is that a tenon is not needed if you use a bolt on system to its full advantage. The tenon just seems to get in the way and makes changing the neck angle more work than is necessary; a leftover vestige from glued in neck origins. You also don't need to use a 1/4 -20 bolt or insert on a mandolin- it is a bit overkill- try something about 1/3 less. The MSC catalog sells long handled allen drivers that are about 14" long- that allows you to screw in the bolts via the endpin hole and not need to worry about odd soundhole configurations or being able to gain access to the inside of the instrument.

    Generally when I'm prototyping a new body design, especially for a larger instrument, I'll regularly use a bolt on neck design, then after the kinks are worked out, I'm back to the dovetail dogma. For all of the work that it can take a small builder to properly integrat a bolt on system, I prefer and reccommend a traditional dovetail. In a production environment where 15 different people all work on the body and neck geometry, the bolt on is fast and easier to get out the door, but I've also seen a lot of broken heels from improper repairs and a trashcan full of broken neck parts from workers trying to keep up the production speed. Do you know what it is like trying to build 2 mandolins a day, every day, before lunch??? I do, and it is not something I ever want to return to....

    j.
    www.condino.com

  8. #33
    Registered User big smiley guy's Avatar
    Join Date
    Mar 2010
    Location
    Middle of the Shenandoah
    Posts
    116

    Default Re: Bolt on neck method

    When I have used the inserts I have put a maple dowel in a mahogany neck heel to add strength and give the thread something more substatial to hold on to but it may not be necessary in a maple neck. The dowel is glued in with Titebond and the inserts never need to be glued.

  9. #34
    Registered User Charles E.'s Avatar
    Join Date
    Feb 2007
    Location
    Saint Augustine Beach FL
    Posts
    6,649

    Default Re: Bolt on neck method

    Well I for one have learned alot from this discussion. I like my system but I will look at it with fresh eyes and see if I can make it easier and faster.
    Charley

    A bunch of stuff with four strings

  10. #35
    Registered User Jim Baker's Avatar
    Join Date
    Jan 2006
    Location
    Merrickville, Ontario, Canada
    Posts
    579

    Default Re: Bolt on neck method

    I'm a bit surprised to find that big leaf maple is much less dense than hard maple. I'm leaning heavily toward the barrel nut idea. A little harder to install but it give me a warm and fuzzy feeling.
    Jim Baker

  11. #36
    Registered User smsuryan's Avatar
    Join Date
    May 2009
    Location
    Down incognito...
    Posts
    24

    Default Re: Bolt on neck method

    Becoming proficient at making bolt on necks could open up a whole new world for your builds....replacement necks for bodies, just like a banjo or a telecaster...

  12. #37
    Registered User Jim Baker's Avatar
    Join Date
    Jan 2006
    Location
    Merrickville, Ontario, Canada
    Posts
    579

    Default Re: Bolt on neck method

    I've been thinking about the possiblity of interchangeable necks. O.M., Mandola, Bouzouki

    Crazy?
    Jim Baker

  13. #38

    Default Re: Bolt on neck method

    It makes neck resets almost a no brainer, too! I haven't had to do that yet with this joint.

  14. #39
    Registered User j. condino's Avatar
    Join Date
    Nov 2005
    Location
    Asheville, NC
    Posts
    2,770

    Default Re: Bolt on neck method

    I did two neck resets last month: A Taylor guitar with a bolt on neck design that took about an hour start to finish and a 1930 Martin with a traditional glued in dovetail that was on one workbench for about a week ( I could have moved faster with it, but after steaming the joint, I like to let it dry out for awhile before putting everything back together) ....

    j.
    www.condino.com

  15. #40
    Registered User Jim Baker's Avatar
    Join Date
    Jan 2006
    Location
    Merrickville, Ontario, Canada
    Posts
    579

    Default Re: Bolt on neck method

    For anyone interested here is what I did. I used a piece of aluminum rod threaded in two places. I drilled from the heel for the rod. I think it will be just peachy.


    Jim Baker

  16. #41
    Horton River NWT Rob Gerety's Avatar
    Join Date
    Aug 2008
    Location
    Vermont - Upper Valley
    Posts
    2,589

    Default Re: Bolt on neck method

    Bourgeois Guitars have bolt on necks. I was a little skeptical. But I have owned one for a long while now and I am convinced it is the way to go if it is done well - at least for guitars.

    Kay (I think) built these funky looking guitars years ago - maybe in the 30s? - that had an adjustable neck joint with a radius so you could very quickly and easily adjust the neck angle. I had one for a few years.
    Attached Thumbnails Attached Thumbnails Click image for larger version. 

Name:	P7024672..JPG 
Views:	253 
Size:	14.0 KB 
ID:	57047   Click image for larger version. 

Name:	P7024676..JPG 
Views:	250 
Size:	22.2 KB 
ID:	57048   Click image for larger version. 

Name:	P7024674..JPG 
Views:	253 
Size:	19.0 KB 
ID:	57049  

    Click image for larger version. 

Name:	P7024671..JPG 
Views:	398 
Size:	19.7 KB 
ID:	57052  
    Attached Images Attached Images   
    Rob G.
    Vermont

  17. #42
    Registered User Luthier's Avatar
    Join Date
    Sep 2002
    Location
    Bunker Hill, West Virginia
    Posts
    789

    Default Re: Bolt on neck method

    I love them. Bottom line. If the sound and tone are not affected, go for it. Wood and glue and strings do not always gaurantee that the instrument (especially the neck) will never need to be worked on or fixed and posibly replaced. It just makes sense. I have taken the body of my Octave kits and I have been able to replace necks with different scale lengths. Its pretty cool. I even have a dulcimer neck I retrofitted to one of the Octave bodies.
    Don
    Last edited by Luthier; Apr-07-2010 at 11:15am. Reason: added more information
    http://www.donkawalek.com
    "The only thing achieved in life without effort is failure."
    Dum Vixi Tacui Mortua Dulce Cano

  18. #43
    Registered User
    Join Date
    Mar 2003
    Location
    Plymouth, MA
    Posts
    49

    Default Re: Bolt on neck method

    Anyone interested in the bolt-on/m&T/dovetail issue should check Sylvan Well's website. www.wellsguitars.com His double tenon joint with no glue at all allows for quick and easy resets and truss rod repairs with no damage to the finish around the fretboard extension. Not sure if it's applicable to mandos however. - Ken

  19. #44
    Registered User Jim Baker's Avatar
    Join Date
    Jan 2006
    Location
    Merrickville, Ontario, Canada
    Posts
    579

    Default Re: Bolt on neck method

    Here's a picture of the joint assembled. I modified the angle to 3° from 2.5°. At this point I'm tempted to glue down the finger board extension. I've made a filler wedge from the same spruce as the top. Just can't see why I'd want to remove the neck any time soon. (If I get it right)

    Jim Baker

  20. #45
    Registered Mando Hack dunwell's Avatar
    Join Date
    Oct 2005
    Location
    Colorado
    Posts
    327

    Default Re: Bolt on neck method

    Quote Originally Posted by Jim Baker View Post
    For anyone interested here is what I did. I used a piece of aluminum rod threaded in two places. I drilled from the heel for the rod. I think it will be just peachy.
    Heh, heh, them photos look familiar!! Nice job Jim. Remember that you can also use furniture bolts instead of the all-thread rod. That works nicely for cases where you don't have a round sound hole to reach through. In that case you put in the furniture bolts from the body side and slip on some capture washers over the threaded ends so that they can't fall back into the body. Then use the long allen wrench through the end pin for tightening. Your final product looks very clean!!

    Laters,
    Alan D.

  21. #46
    Registered User
    Join Date
    May 2004
    Location
    Northern Ontario, Canada
    Posts
    828

    Default Re: Bolt on neck method

    Bourgeois Guitars have bolt on necks. I was a little skeptical. But I have owned one for a long while now and I am convinced it is the way to go if it is done well - at least for guitars.

    So do Collings, Huss&Dalton, Taylor, myself, as well as many, many other mid to high end guitar builders. In fact, I'd venture that there are more bolt on necks on mid to hjgh end guitars these days than dovetails. There's no tone or power penalty(I built a year's worth of guitars with dovetailed necks some time back to see if they're be better or worse than those previous and those after, and there was no perceptible difference at all, not when new, not today), but there's a definite advantage when it comes time to repair or adjust. We can reset a neck in minutes without risking damage with heat and steam, even on those that still glue the fretboard down to the top(myself, Collings, etc..). Mandolins don't need neck resets nearly as soon or as often, if at all, as guitars, due to their stiffer build(smaller spans, shorter ribs/sides), and the adjustable bridge allows a lot of adjustment room, so the advantage here is more or less moot. I can't think of a disadvantage, though, other than buyer resistance(which we've finally overcome with guitars).

    A little side note: on a guitar, bolt on necks actually take more time to build and install than a dovetail neck, especially in a factory setting. You'll not find a bolt on neck on any inexpensive Asian guitar for this reason.

  22. #47
    Registered User Jim Baker's Avatar
    Join Date
    Jan 2006
    Location
    Merrickville, Ontario, Canada
    Posts
    579

    Default Re: Bolt on neck method

    Thanks everyone. Another question: I received my carbon fiber today for the neck stiffener. The plan was to insall a piece 3/16" x 1/2" deep. I could only get .200" x 1/4" from stewmac. I am planning to stack the two pieces.

    Will the two pieces be as stiff as one solid piece? Should use a special glue to cement the two piece together before installing" It seems pretty strong, but maybe not as stiff as steel.
    Jim Baker

  23. #48
    Registered User Jim Baker's Avatar
    Join Date
    Jan 2006
    Location
    Merrickville, Ontario, Canada
    Posts
    579

    Default Re: Bolt on neck method

    Hi again. I've installed the fretboard and added a wedge under the extension. I plan to string it up and play it in the white and then I'll decide if I should glue down the extension.

    Jim Baker

  24. #49
    Registered User big smiley guy's Avatar
    Join Date
    Mar 2010
    Location
    Middle of the Shenandoah
    Posts
    116

    Default Re: Bolt on neck method

    It's looking pretty good - I hope to build an Octave in the not too distant future - once I've finished a few of my other projects.

  25. #50
    Registered User whyner's Avatar
    Join Date
    May 2010
    Location
    Oregon
    Posts
    113

    Default Re: Bolt on neck method

    Hello Jim Baker:

    Any updates? I went scrounging around the woodpile to see what I could come up with for an OM because of this thread!

    Steve
    Oregon

Tags for this Thread

Bookmarks

Bookmarks

Posting Permissions

  • You may not post new threads
  • You may not post replies
  • You may not post attachments
  • You may not edit your posts
  •