Page 1 of 2 12 LastLast
Results 1 to 25 of 30

Thread: Neck Joint Question

  1. #1

    Default Neck Joint Question

    This Santa Rosa would not warrant a reset by a good luthier due it's low replacement cost. But I do likes to tinker a bit. The gap between the neck heel and body appeared a few days ago after I noticed the action was suddenly a bit high up the neck. I removed the strings right away and noted very slight movement at the joint. I cut throught the finish with an xacto and a razor saw. I confimed that the fingerboard extension goes down into or thru the ply top.

    I removed the fingerboard with a clothes iron. There were no locating pins or screws visible, and no visible dovetail gap or pocket. From reading other posts after a forum search, I guess I'm gonna need to drill down into the joint between the end of the neck and the fretboard extension support and apply a steam needle. Any guesses on whether I have a mortise and tenon, shallow straigt dovetail or other joint? If dowels are present I should probably drill off-center on either side of the neck midline, right?

    Thanks,

    Scott
    Attached Thumbnails Attached Thumbnails Click image for larger version. 

Name:	P1000548.JPG 
Views:	208 
Size:	127.6 KB 
ID:	74919   Click image for larger version. 

Name:	P1000545.JPG 
Views:	201 
Size:	132.0 KB 
ID:	74920   Click image for larger version. 

Name:	P1000549.JPG 
Views:	259 
Size:	166.4 KB 
ID:	74921  

    Click image for larger version. 

Name:	P1000550.JPG 
Views:	198 
Size:	163.1 KB 
ID:	74922  

  2. #2
    Registered User
    Join Date
    Sep 2003
    Location
    Nashville
    Posts
    4,966

    Default Re: Neck Joint Question

    You may try pulling the neck back and see if it will come back into position. If so, apply some glue into the joint and pull it back into position and clamp it solidly and leave it for 24 hours. That may save you a real mess. Sometimes these older less expensive ones will pull back into position. It is certainly worth a try.
    Have a Great Day!
    Joe Vest

  3. #3
    Registered User Rob Grant's Avatar
    Join Date
    Mar 2004
    Location
    FNQ, Australia
    Posts
    1,182

    Default Re: Neck Joint Question

    Scott,

    Take Joe's good advice. It sounds like you have one of those "less expensive" dowel pinned necks (there will be two dowels holding the whole works). Typically with these instruments the heel button is not part of the back plate as it should be with a "proper" join. In truth, I'd save my efforts for a better instrument and go for the simpliest "patch" job on this one.

    Been there, done that.<G>
    Rob Grant
    FarOutNorthQueensland,Oz
    http://www.grantmandolins.com

  4. #4
    Registered User Wes Brandt's Avatar
    Join Date
    Aug 2010
    Location
    Portland, Oregon, Earth
    Posts
    362

    Default Re: Neck Joint Question

    I almost never use epoxy but in this case, slow set epoxy injected with a syringe would be in order... it may be a badly fit joint and the epoxy would fill any gaps and also ...stick! You can get glue syringes from a good hardware or woodworking supply house... Drill a hole the diameter of the needle into the heart of the joint, warm it up to help the glue flow... inject glue and work the neck until you convince yourself it's full... clamp in position.
    WesBrandtLuthier.com
    BrandtViols.com

  5. #5
    Café habitué Paul Hostetter's Avatar
    Join Date
    Sep 2003
    Location
    Santa Cruz, California
    Posts
    6,286

    Default Re: Neck Joint Question

    The neck is probably held in place by dowels, and can be tapped straight out. I'd try to get it and the support piece off the instrument and then clean all the old glue out before reassembling. Otherwise you risk a very brief fix by gluing old glue to old glue, rather than wood to wood.

    How to tap it out? Clamp a 1x1 block to the neck where the board came off, and tap that. It looks like it's ready to fall apart already.

    I certainly sympathize with Rob's advice. However you have little to lose (other than time!) in attempting a real repair, and may end up with a nice reliable beater afterwards. Be careful cleaning and truing the fingerboard surface before you glue that back on.
    .
    ph

    º º º º º º º º º º º º º º º
    Paul Hostetter, luthier
    Santa Cruz, California
    www.lutherie.net

  6. #6

    Default Re: Neck Joint Question

    Thanks for all the advice!

    I am processing the data now and will report back soon. The gap is small and my glue syringes wouldn't fit. There is very lttle movement, but it will close with pressure. Wedging it open with some light taps to the back of a screwdriver I got it open enough to accept the cleaned thin red tube from a wd-40 can (barely). Modified the glue syringe to accept the same tube, and prepared some cauls for clamping. However, I would be concerned that little glue would get to where it needs to go given the small opening. I'm inclined to try removing the neck per Paul's suggestionb. Will report back soon. Thanks again.

    Scott

  7. #7
    Registered User Rob Grant's Avatar
    Join Date
    Mar 2004
    Location
    FNQ, Australia
    Posts
    1,182

    Default Re: Neck Joint Question

    Scott,

    Good advice from Paul. After taking another look at your photos, I think I remember repairing one of these same type of mandolins for a mate about ten years ago. For its price, it didn't have such a bad tone or volume. After I repaired the neck and "lollied" the instrument up a bit the friend renamed it "Lazarus."<g>

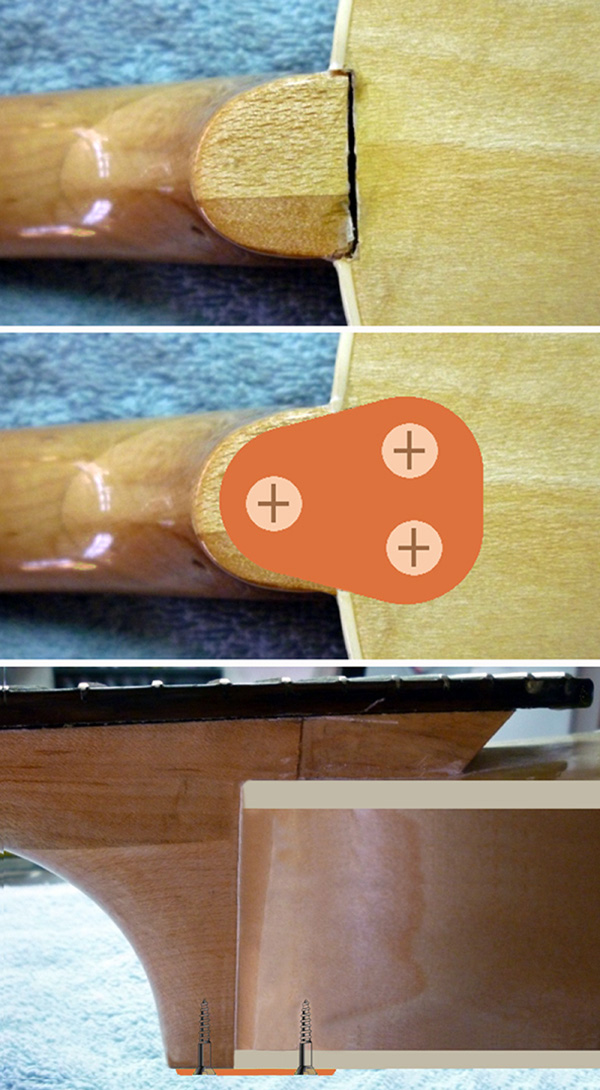
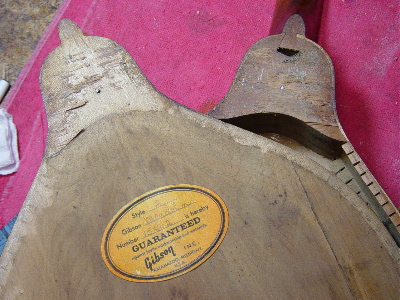
    One thing you might watch on these is the "built up" neck heel. What often can happen is that you secure the face of the neck to the headblock (with the two dowels) and string tension will cause the heel block joint to separate (red "X" below).

    You can also see in the other photo a neck heel with a similar configuration that separated at the heel block join. As you can see the join is dead centre of one of the two dowel holes. This photo shows a bit of "wood butchery" that was necessary to install a secure heel button.

    Click image for larger version. 

Name:	Clipboard01.jpg 
Views:	245 
Size:	17.3 KB 
ID:	74941 Click image for larger version. 

Name:	Tony1.jpg 
Views:	256 
Size:	30.5 KB 
ID:	74943
    Rob Grant
    FarOutNorthQueensland,Oz
    http://www.grantmandolins.com

  8. #8

    Default Re: Neck Joint Question

    Thanks for the pic Rob. I'll keep an eye on the stacked heel joint. That bit hasn't failed yet on mine. Seems a poor place to put a dowel. I shined a flashlight into the gap between the bottom of the heel and the back plate and noted the flat, lower surface of the neck tennon extending back over the interior surface of the back plate. Can't open the gap any wider to see the vertical face of the tennon, so I think there would be no way to get glue in without removing the neck or cutting away a bit of the back. I might do a heel cap as you prepped for above once it's reset. Steamer parts now at hand.

    Scott

  9. #9

    Default Re: Neck Joint Question

    Just a thought - you might try a hair dryer first. I suggested this to someone who had a banjo uke with dowelled neck, and it worked first time. Of course, this assumes you (or more likely your significant other) actually own a hair dryer. But if you do, it only takes 10 mins to try this out and is less messy than steam.

    As someone else posted, that joint looks ready to slide apart with very little persuasion. Some heat might be all it needs.

  10. #10

    Default Re: Neck Joint Question

    Thank Prof Chris,
    I might try that on the FB extension support after putting a hot putty knife to the accessable joints.

    Scott

  11. #11

    Default Re: Neck Joint Question

    Neck fell off after 3 or 4 minutes of steam. No dowels. Rather shallow straight dovetail. Here's few pics for now.

    Scott
    Attached Thumbnails Attached Thumbnails Click image for larger version. 

Name:	P1000555.JPG 
Views:	234 
Size:	146.4 KB 
ID:	75040   Click image for larger version. 

Name:	P1000552.JPG 
Views:	226 
Size:	149.9 KB 
ID:	75041   Click image for larger version. 

Name:	P1000551.JPG 
Views:	210 
Size:	150.1 KB 
ID:	75042  

    Click image for larger version. 

Name:	P1000558.JPG 
Views:	1710 
Size:	103.7 KB 
ID:	75043   Click image for larger version. 

Name:	P1000556.JPG 
Views:	187 
Size:	155.6 KB 
ID:	75044  

  12. #12

    Default Re: Neck Joint Question

    The depth of the mortise in the body is 3/8". The lower 7/16 of the tennon is relieved to fit around the back and a portion of headblock. That little step in the headblock is poorly fitted, having been cut away with two stokes of a small gouge. The gap between the lower face of the tennon, and the curving remnant of the block varies form 1/8 to 3/16" at least. I may be able to improve things there a bit. Hide glue was used here, as well as on the fingerboard. I was suprised there were no shoulders to the neck tennon.

    Only a little glue was found on the sides of the mortise, mostly in the back corners. No glue to speak of was noted on the edges of the tennon. You can see a few blobs of glue on the face of the tennon in one pic. The most solid joint was the butt join between the neck and the extension support.I've done some preliiminary cleaning up of the old glue. Will do some more followed by a few days or drying.

    I took a few measurements prior to the neck removal, so that I could get the neck back on straight and at roughly the correct angle, but would greatly appreciate some tips on setting the neck angle properly, any advice on improving the joint, and any other relevant suggestions.

    I will either intall a new pre-slotted fingerboard with longer wearing frets, or will plane and refret the old board with SS oe EVO gold. Wondering about intalling a truss rod or equivalent cf.

    Thanks for all the suggestions so far!

    Scott

  13. #13

    Default Re: Neck Joint Question

    With such a shallow mortise & no heel button, there's not much non-endgrain gluing surface to this joint. Without some additional help, I doubt you'll get it to hold. I'd consider converting it to a bolt-on joint with one or two barrel nuts in the neck heel & bolts inserted with a long allen wrench through the end pin hole.

    Neil

  14. #14

    Default Re: Neck Joint Question

    Thanks NRMiller-

    After loooking at various neck joints on the Simonoff, Weber, and other pages, I had come to the exact same conclusion. As it is, this one is closest to Simonoffs pinned V-joint, but with no room to place the dowel pins due to the short tennon. I like the look of Webers approach to bolt ons from their web page.

    I know I've read the thread about screw inserts vs barrel nuts for bolt on necks recently, complete with a link to the hardware. I'll search it up again. I can also improve the fit of the basic joint to get somewhat better contact. Glad I've got the Martin to pick while the repair is underway.

    Scott

  15. #15

    Default Re: Neck Joint Question

    Found the relevant thread.

  16. #16
    Café habitué Paul Hostetter's Avatar
    Join Date
    Sep 2003
    Location
    Santa Cruz, California
    Posts
    6,286

    Default Re: Neck Joint Question


    This is a typical violin-style mortise with one critical difference: no connection of the back (the button) to the heel of the neck. I would regard this as a fatal flaw. But quite correctable.
    .
    ph

    º º º º º º º º º º º º º º º
    Paul Hostetter, luthier
    Santa Cruz, California
    www.lutherie.net

  17. #17

    Default Re: Neck Joint Question

    Thanks Paul,
    I looked at the heel button mod in Rob's pic above. Let me see if I have it right. Looks like the cut into the back is all inside the lower face of the headblock. Fortunately I've got 1 1/8" of headblock thickness( course I'd better leave 3/16 to 1/4" for the back to land on at the sound chamber side of the block in that area). So I'd guess about a 1/8 thick ebony or mesquite cap to get below the back and tie the heel to the headblock? I'm considering a couple 10-32 bolts into threaded inserts or barrel nuts in the tennon as well.

    Scott

  18. #18
    Café habitué Paul Hostetter's Avatar
    Join Date
    Sep 2003
    Location
    Santa Cruz, California
    Posts
    6,286

    Default Re: Neck Joint Question

    Scott -

    This is a fairly basic and expedient repair but far exceeds any others in strength under this circumstance. I use something similar for plywood basses that have snapped the buttons. Yours never had one in the first place, but a simple brass plate spanning and connecting the heel of the neck to the back and the neckblock will keep that neck secure. If you make the plate from a nice piece of brass and use nice screws, and polish it up, it'll look good.


    In a violin, there's an invisible repair which involves gluing a veneer under the back and under the button, also connecting the heel of the neck to the heelblock. It's not practical with an instrument of the value of yours.

    The reason for including the back of your mandolin rather than just the heelblock (which would be possible if you buried the plate under a decorative wood veneer) is that it incorporates the entire back, which might be more useful than you think. You could find that if you did a more elegant concealed reinforcement that the back would separate from the heelblock, leaving the string tension pulling the neck and heelblock out together. I've seen it happen.

    If you do the plate, just glue everything back together first, as snug as you can get it.

    Dowels compress, they're not as solid as screws.

    Bolts through the heel and into the neckblock also tend not to work because they are going with the grain of the heel of the neck which is also weak as it is.
    .
    ph

    º º º º º º º º º º º º º º º
    Paul Hostetter, luthier
    Santa Cruz, California
    www.lutherie.net

  19. #19
    Registered User swampy's Avatar
    Join Date
    Jul 2007
    Location
    Brookfield, New Hampshire
    Posts
    332

    Default Re: Neck Joint Question

    Paul, does this mean that the back button attached to the heel of a violin or Campanella style neck joint is actually structural? If so any idea how much it contributes to to the overall integrity? I always wondered what kept those fiddle necks from simply pulling apart.

  20. #20
    Café habitué Paul Hostetter's Avatar
    Join Date
    Sep 2003
    Location
    Santa Cruz, California
    Posts
    6,286

    Default Re: Neck Joint Question

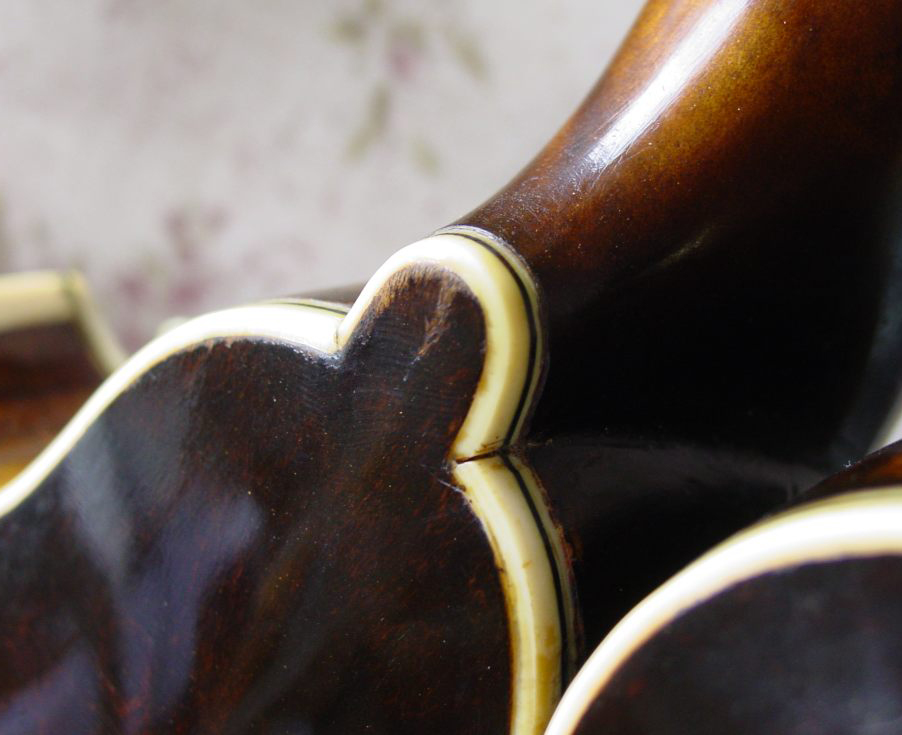
    The button is extremely important structurally—essential, really. It's on all violin family instruments, and much of Gibson's mandolin family as well.


    The distortion you see there is ivoroid shrinkage. The neck joint is solid as can be.

    This one is not a Loar, but you get the idea:

    .
    ph

    º º º º º º º º º º º º º º º
    Paul Hostetter, luthier
    Santa Cruz, California
    www.lutherie.net

  21. The following members say thank you to Paul Hostetter for this post:


  22. #21
    Registered User swampy's Avatar
    Join Date
    Jul 2007
    Location
    Brookfield, New Hampshire
    Posts
    332

    Default Re: Neck Joint Question

    Well that helps explain a neck failure on a kit a built a few years ago. Thanks Paul.

  23. #22

    Default Re: Neck Joint Question

    Wow that is a neat, simple idea for a fix Paul. Thanks for the great graphics as well. I will definately use the heel cap plate on top of the back approach as there isn't much to spoil asthetically. Will post some pics of the joint when shimmed and refitted.

    Scott

  24. #23
    Registered User
    Join Date
    May 2004
    Location
    Northern Ontario, Canada
    Posts
    828

    Default Re: Neck Joint Question

    Another "quick and dirty" yet plenty strong and cosmetically "neutral" solution(IE: you're not adding an obvious "fix", like the brass plate) is to add a strap button to the heel, and use a long enough screw to take hold solidly into the neck block. Use a correctly sized drill bit to drill a pilot hole --after-- you glue the neck back on as well as you can. Then the screw and strap button will simply assist the glue in holding the neck in place, and in place it should remain, forever.

    And you get a place to tie your strap to....

  25. #24
    Café habitué Paul Hostetter's Avatar
    Join Date
    Sep 2003
    Location
    Santa Cruz, California
    Posts
    6,286

    Default Re: Neck Joint Question

    Then the screw and strap button will simply assist the glue in holding the neck in place, and in place it should remain, forever.
    Except the screw is going with the grain of the heel, which is already pretty flimsy, and you're on very thin ice. On a guitar this is somewhat more reliable, but a mandolin has considerably more tension, meaning that screw has a great deal more work to do. I don't give it a very rosy prognosis for survival.
    .
    ph

    º º º º º º º º º º º º º º º
    Paul Hostetter, luthier
    Santa Cruz, California
    www.lutherie.net

  26. #25

    Default Re: Neck Joint Question

    Already got a strap button hole, but it's on the off side of the heel. I don't think I'll use any fastners into the neck end grain. I do have the hardware on hand to use a bolt-on approach mentioned in an earlier thread that does not involve placing screws or inserts into the end grain.

    This method uses barrel nuts (called cross dowel nuts at Home Depot) slipped into a 9/32" hole drilled vertically from the base of the heel upward, along the grain to wherever you want to place the bolt(s). The insert slips in like a short metal dowel with a threaded hole across the middle to secure a 1/4-20 socket head cap screw threaded through the headblock from the enlarged endpin hole. In this case the barrel nut would be inset 1/4" from the face of the tennon due to the offset from the truncated lower end of the tennon. The hole in the base of the heel is then plugged with a dowel and cut flush. I have floor a drill press to make the holes, but the whole hex extension through the endpin hole part is a little daunting.

    I will give it a go if it is felt that the brass heel cap by itself is not strong enough ( I'd like to continue using J74s). There is a good mock-up of this hardware(thanks to Charles E.) about half way down on the thread titled "Bolt on neck method".

    Scott

Bookmarks

Bookmarks

Posting Permissions

  • You may not post new threads
  • You may not post replies
  • You may not post attachments
  • You may not edit your posts
  •